'fingers KR1-S C2 tinkering with a mostly stock bike
-
geezagillard
- Smoker
- Posts: 78
- Joined: Wed Jul 18, 2007 10:31 am
Re: 'fingers KR1-S C2 tinkering with a mostly stock bike
where did you find the KIPS end pieces philfingers?
-
James P

- Oil Injector
- Posts: 582
- Joined: Mon Mar 11, 2013 10:47 am
- Location: Sydney, Australia
Re: 'fingers KR1-S C2 tinkering with a mostly stock bike
This would indicate that the piston dome profile doesn't match the squish band. In researching my topic on pistons (viewtopic.php?f=1&t=10280&start=15), I found that the Mitaka piston dome profile was (as far as I could tell) identical to that of the OE Kawasaki piston. I haven't got a cylinder head close to hand at the moment (KR-1 engine rebuild projects on back burner at the momentphilfingers wrote:You can see that the outside of the RH pot is 0.36mm right at the cyl wall, but 5mm inside and it's 0.62mm
Personally, I'd like to see the profiles match exactly, so that the squish clearance is uniform all the way from the bore edge to the combustion chamber. However, some (perhaps many?) Japanese two-strokes have a squish band with a smaller radius than the piston dome, giving a variable squish clearance (increasing towards combustion chamber).
In your case Phil, recutting the squish bands to a different radius (i.e. a radius closer to that of the piston dome) would give you a more suitable squish clearance, but its not exactly a 5-minute job! Thoughts, opinions and experience welcome
Regards,
James
-
KR-1R
- Premix Junkie
- Posts: 1587
- Joined: Wed May 16, 2007 2:24 am
Re: 'fingers KR1-S C2 tinkering with a mostly stock bike
if squish was even rather than tapering
could result in charge not moving from edge to center
areas of dilute. pockets for detonation
toothpaste moves away from pinching point of tube
could result in charge not moving from edge to center
areas of dilute. pockets for detonation
toothpaste moves away from pinching point of tube
-
philfingers
- Heavy Smoker
- Posts: 207
- Joined: Tue Apr 12, 2011 11:14 am
- Location: Worcestershire
Re: 'fingers KR1-S C2 tinkering with a mostly stock bike
ah yes, I hadn't considered a bent rod, or that way of checking.
Would two stock base gaskets be OK, or should I order some gasket paper and make them?
James- I had read your piston thread with interest before I started on the top end. As per my previous post I don't believe the Mitaka and stock [?] Art pistons have the same radius. The height at the edge of the piston and the crown heights are the same but by eye I'd say the radius of the Mitaka is tighter, so come in X amount from the cyl edge and the piston will be higher than X on a stock one. What doesn't change is the squish dim' right at the cyl wall.
I suppose on hindsight I should have checked the squish on the stock set up too before I swapped the pistons. When i measure the barrels for height I only measured the front and back height, not the left and right. I really should have measures the squish front and back too. Also when i measured squish I did it without rings [or circlips], as it would all come apart again. I can't imagine that would make any difference. But on hindsight it could allow the RH pot piston to sit closer to the RH side and result in the tighter squish
Looks like i'll be back inside soon, starting with a 4 way squish check on each cyl as it is now to start with.
Oh and the barrels are the correct ones for a KR1-S from the casting ID
-
philfingers
- Heavy Smoker
- Posts: 207
- Joined: Tue Apr 12, 2011 11:14 am
- Location: Worcestershire
Re: 'fingers KR1-S C2 tinkering with a mostly stock bike
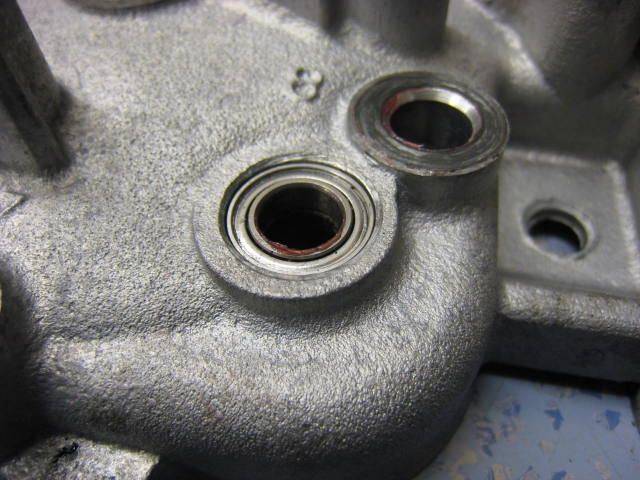
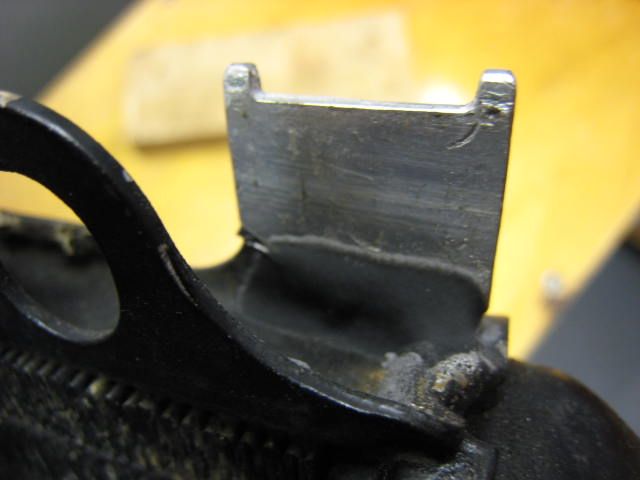
here's one of the bearing fitted for the KIPS which I forgot to include the other night
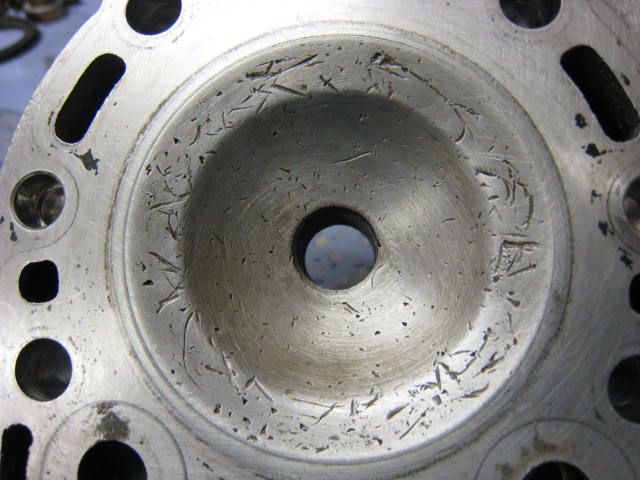
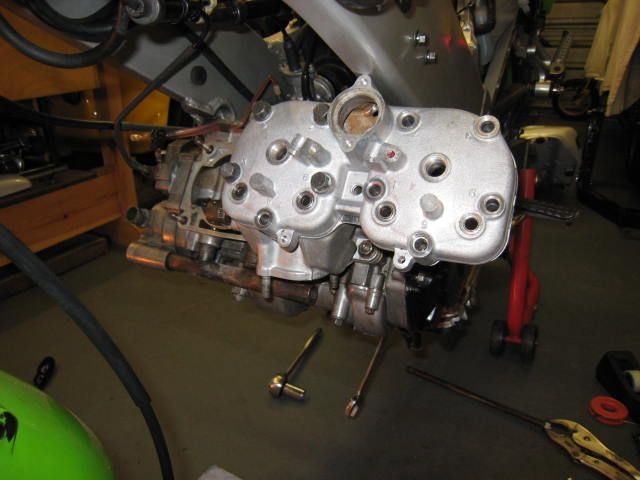
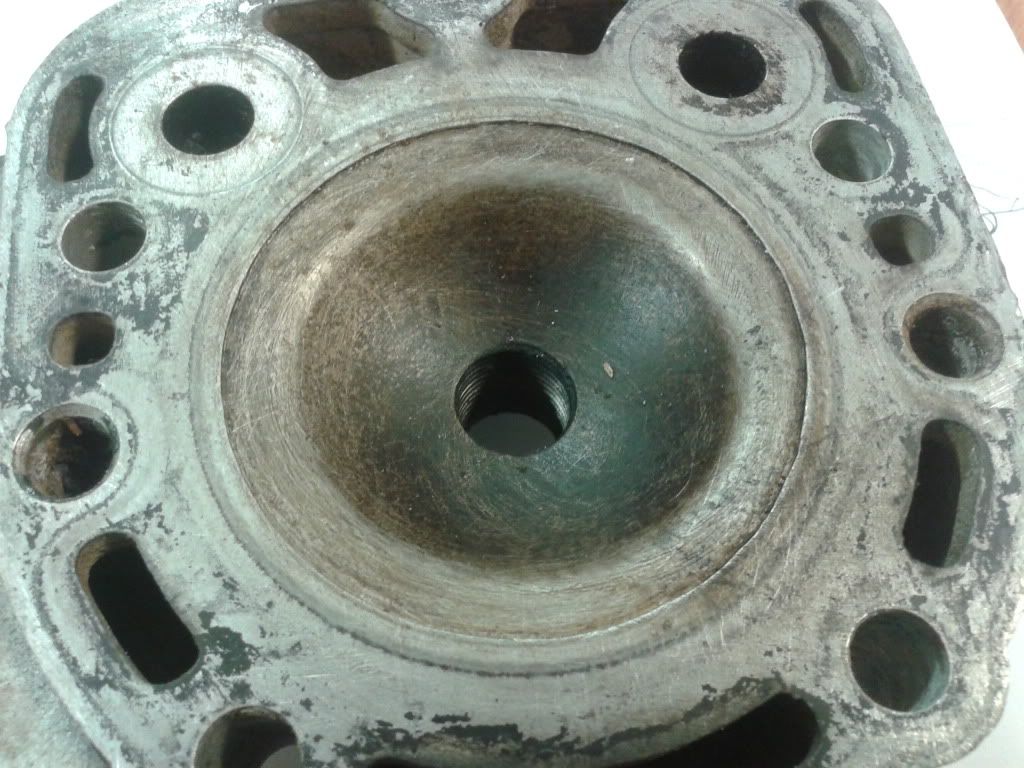
So I took the head off, here it is. This is the LH side, showing previous damage
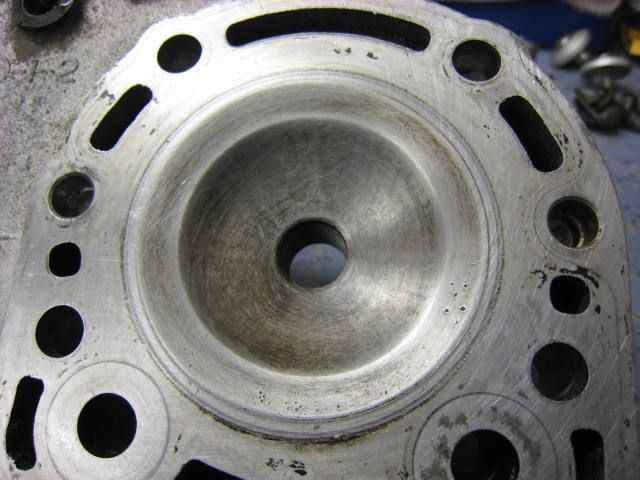
and the RH one, can anyone comment on if it's been machined, or does it look standard?
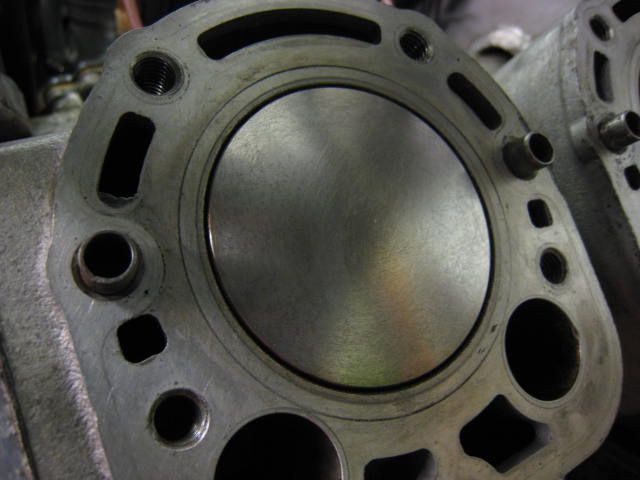
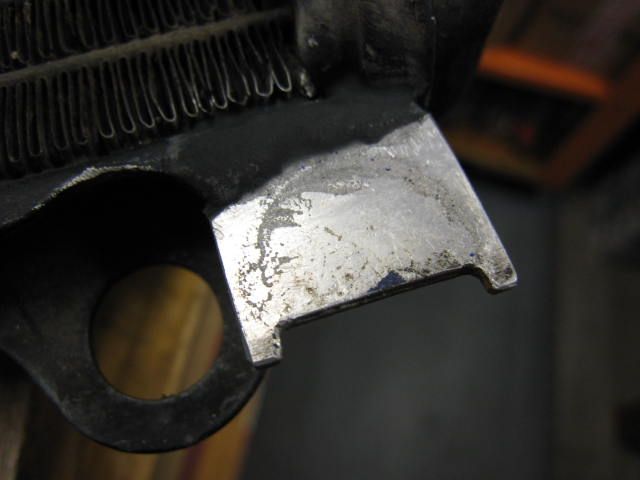
The RH piston, this was the one with the 0.36mm squish on the outside edge. No sign of contact there.
So I did a four way squish on the current set up
LH side
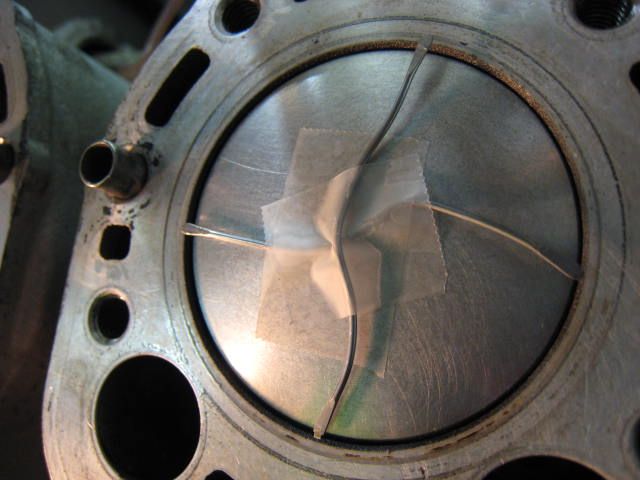
RH side
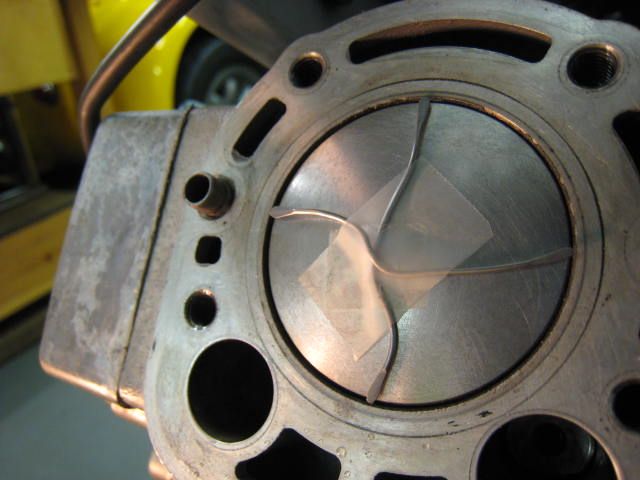
Results
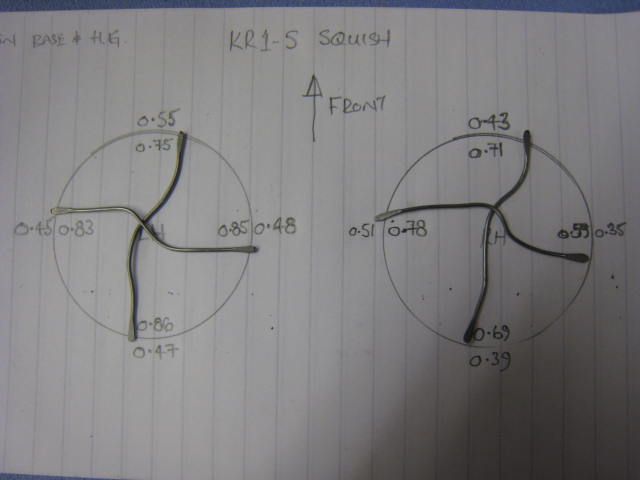
You can see the measurement are pretty close to what I got before, measurements inside the circle are the ~5mm inside the cyl wall squish.
Then as JanBros suggested I swapped the RH barrel to the LH side, with it's piston and the head [which caused me grief getting the barrel dowel out and then having to drop the motor down- this bike is so easy to work on tho compared to the ducati's!]. The result was very similar to when the components were installed on the RH side. So rules out a bents rod.

Now I measured the old base gaskets at 0.54mm and the new ones at 0.46mm. The old ones were fitted to the bike.
So I guess I need about 0.9 to 1.0mm thick base gaskets. I ordered some paper to make some up. I guessed it was a better option than using two stock base gaskets togther
Hopefully I've found a solution to the broken oil pump bamjo. I'll post my findings!

So I took the head off, here it is. This is the LH side, showing previous damage

and the RH one, can anyone comment on if it's been machined, or does it look standard?

The RH piston, this was the one with the 0.36mm squish on the outside edge. No sign of contact there.

So I did a four way squish on the current set up
LH side

RH side

Results

You can see the measurement are pretty close to what I got before, measurements inside the circle are the ~5mm inside the cyl wall squish.
Then as JanBros suggested I swapped the RH barrel to the LH side, with it's piston and the head [which caused me grief getting the barrel dowel out and then having to drop the motor down- this bike is so easy to work on tho compared to the ducati's!]. The result was very similar to when the components were installed on the RH side. So rules out a bents rod.


Now I measured the old base gaskets at 0.54mm and the new ones at 0.46mm. The old ones were fitted to the bike.
So I guess I need about 0.9 to 1.0mm thick base gaskets. I ordered some paper to make some up. I guessed it was a better option than using two stock base gaskets togther
Hopefully I've found a solution to the broken oil pump bamjo. I'll post my findings!
-
KR-1R
- Premix Junkie
- Posts: 1587
- Joined: Wed May 16, 2007 2:24 am
Re: 'fingers KR1-S C2 tinkering with a mostly stock bike
.
.
on the head there's normally a fraction of a mm step from gasket face into each chamber
your head looks like it been skimmed already
I think the new OEM gasket is around 0.4mm - a swallen used one might be thicker or thinner in places where its been squashed
youll need to consult Janbros to see how thick a cornflake box is
viewtopic.php?t=5108&start=165
-
philfingers
- Heavy Smoker
- Posts: 207
- Joined: Tue Apr 12, 2011 11:14 am
- Location: Worcestershire
Re: 'fingers KR1-S C2 tinkering with a mostly stock bike
Interesting project that.
I ordered some 0.8mm gasket paper, then ordered some 1.0mm too. I thing the latter is best!
You got me thinking on the head volume so I did a little work on that.
I cut a plate out of perspex/lexan or something like that

then with a bit grease to seal it I measured the volume, using paraffin
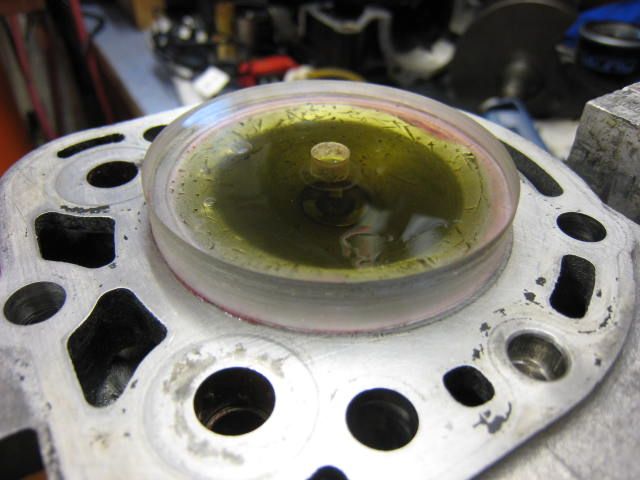
with the plugs in i'm getting around 10.5 to 11.0ml FPV
-
dmac
- Heavy Smoker
- Posts: 173
- Joined: Fri Aug 31, 2012 4:27 am
- Location: Ireland
Re: 'fingers KR1-S C2 tinkering with a mostly stock bike
Looking at the differences between the heads,
Would all your problems be solved by getting a head that hasn't been skimmed?
Would all your problems be solved by getting a head that hasn't been skimmed?
I used to be undecided, but now I am not so sure.
-
philfingers
- Heavy Smoker
- Posts: 207
- Joined: Tue Apr 12, 2011 11:14 am
- Location: Worcestershire
Re: 'fingers KR1-S C2 tinkering with a mostly stock bike
Yes I did wonder about that. The problem is finding a good one and I could end up with one that's just as bad, or warped etc. This one is ok and I've had no leaks.
I was just looking at the figures in anticipation of the gasket sheet hopefully arriving today.
The squish is slightly tighter on the RH pot than the LH one, i need to measure the pots more accurately, I only measured the front and back of each one and they were close from memory
I was just looking at the figures in anticipation of the gasket sheet hopefully arriving today.
The squish is slightly tighter on the RH pot than the LH one, i need to measure the pots more accurately, I only measured the front and back of each one and they were close from memory
-
James P
- Oil Injector
- Posts: 582
- Joined: Mon Mar 11, 2013 10:47 am
- Location: Sydney, Australia
Re: 'fingers KR1-S C2 tinkering with a mostly stock bike
Well, I suppose it is better to have the taper expanding towards the centre of the bore than contracting, BUT I'd still rather have the profiles match exactly. If the profiles match and squish clearance is minimum (i.e. optimum), there should be no pockets left to hold enough mixture which could detonate. I also suppose that if the chosen fuel burns fast enough, the present tapered arrangement shouldn't cause too much bother. I wonder if the profiles are made like this due to some mass-production consideration (i.e. to avoid accidentally ending up with a taper which goes the other way, which I'd imagine WOULD promote detonation)?KR-1R wrote:if squish was even rather than tapering
could result in charge not moving from edge to center
areas of dilute. pockets for detonation
toothpaste moves away from pinching point of tube
I've taken profiles of the piston and head and transferred them to paper. There is a noticeable difference in radius/profile, but only just! As the difference is so small and the squish band is comparatively narrow, I don't think it would be worth worrying about on a standard engine. I'd still make the effort to optimise squish clearance though...
Could it be that the Mitaka pistons you've bought (being from the TZR250 casting) have not had their crowns re-machined, or have had the re-machining done incorrectly?? When I compared a Mitaka piston dome profile to that of an original piston, they seemed near enough to identicalphilfingers wrote:...I don't believe the Mitaka and stock [?] Art pistons have the same radius.
Regards,
James
-
James P
- Oil Injector
- Posts: 582
- Joined: Mon Mar 11, 2013 10:47 am
- Location: Sydney, Australia
Re: 'fingers KR1-S C2 tinkering with a mostly stock bike
Does this method take into account the piston dome, or is the lexan flat on both sides?philfingers wrote:...with the plugs in i'm getting around 10.5 to 11.0ml FPV
When the engine is apart, I prefer to measure combustion chamber volume by smearing a thin film of grease around the squish band and seating the piston onto it, then taping the piston in place. Turning the assembly the right-way-up, diluted oil or other suitable fluid can be injected through the plug hole until it reaches the bottom of the thread. Of course, the amount of fluid injected will be the head volume with zero squish clearance, but I have found it convenient to estimate the volume of the desired squish clearance and add it to the measured volume to calculate the compression ratio. Up to now, I have neglected the volume of the space around the spark plug insulator. My method errs on the side of caution a bit, as (when the engine has been assembled) I always end up with a combustion chamber volume very slightly larger than the initial combined measurement & calculation. I always like to confirm the volume when the engine has been built by injecting oil into the plug hole when the piston is at TDC.
Despite this, the upside-down-flat-plate method can be useful when needing to machine the combustion chamber, as you're only looking for a change in volume, rather than an absolute volume.
As always; opinions, knowledge and/or experience is welcome
Regards,
James
-
philfingers
- Heavy Smoker
- Posts: 207
- Joined: Tue Apr 12, 2011 11:14 am
- Location: Worcestershire
Re: 'fingers KR1-S C2 tinkering with a mostly stock bike
James, some good points and thinking about it logically I'm talking out of my arse!
if the centre point [crown] is the same height, width is the same and height at the sides of the piston are the same then assuming a constant radius it must be the same radius on both. Yes it's a machined piston from a 1KT. Definitely been on the lathe tho.
FPV is just the head, it doesn't take piston into consideration. If you know the squish, you could leave a little solder on the piston top and do it accurately with the head on barrels with pistons in the bores pushed right up the the solder. Or as you say just do it on the engine.
I've decided to try and use the old gaskets, they're slightly thicker and some 0.4mm gasket paper with them. Might be a lottery getting two gaskets to seal. But it should give me about 0.75mm on the lowest point on the RH cyl. Incidentally i measured the barrels and that side with the low squish is the slightly low on the barrel height, but only about 0.04mm max difference.
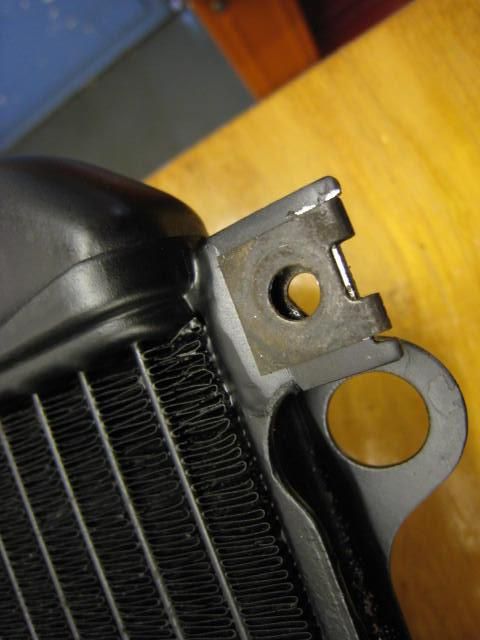
I decided on another little job which turned out taking longer.
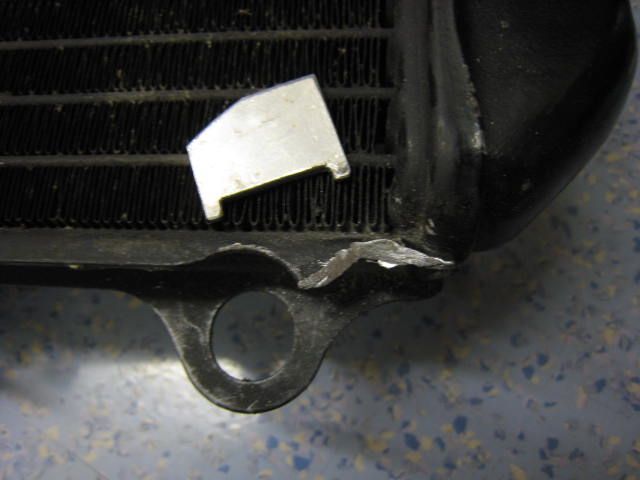
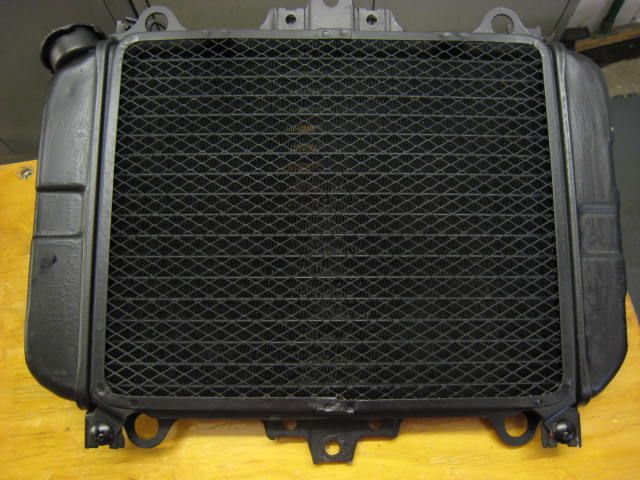
I removed the grill off the rad, it was a little rusty, with the intention of sticking in the blast cab' and a quick blow over in satin black. Despite using the gas torch on the screw the retaining tab broke!
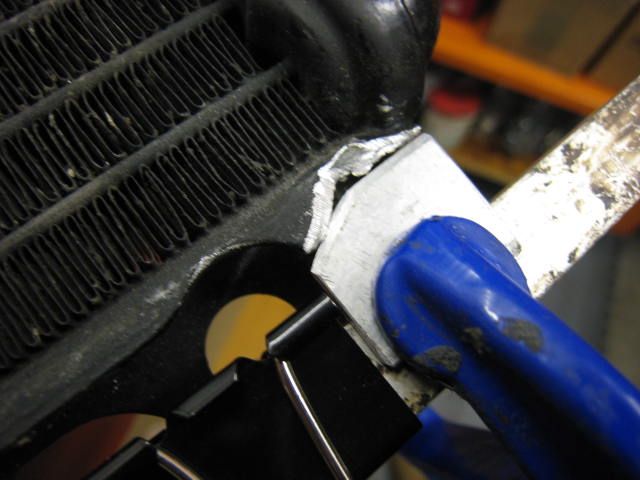
So I cleaned it up and made a new tab out of alloy.
I tried to use a Techno-Weld kit, which I have successfully fixed an alloy oil cooler with the in the past. Only this time I couldn't really get enough heat in to it. Rad's are tricky, they take the heat away too quick!
Now I've intimated at this stuff before, Plastex
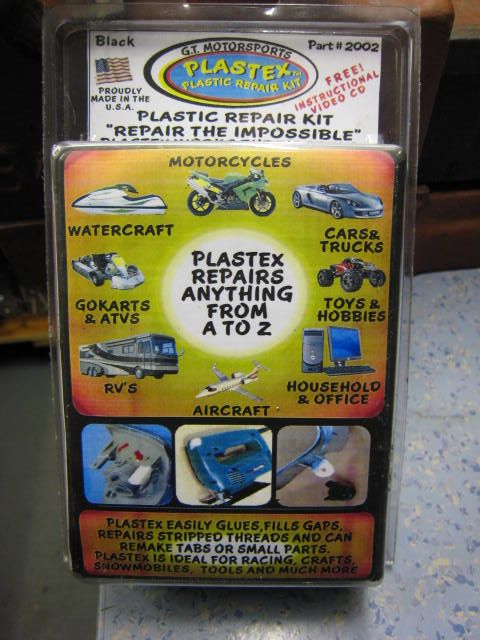
I thought I'd give it a go. Other than filling the stripped thread on the kips linkage I've only used it on the NC30 fairing and bits of the ZXR, so . .
you pour the powder in and then drop small amounts of the liquid on top, I left it a hour, removed the bracing [used to hold in place] and then did the other side, then left over night. Then drilled the hole in the middle and blasted it to provide a good key for the paint. quick spray of paint. Putting it back together I had to give the captive nut clip thing a tap with the hammer to get it to slide on. The joint is nice and strong, bearing in mind it's only holding the grill in place but I gave it a bit of bend and no cracking. More to follow on the Plastex when I sort a few body crack out. It's good stuff!
if the centre point [crown] is the same height, width is the same and height at the sides of the piston are the same then assuming a constant radius it must be the same radius on both. Yes it's a machined piston from a 1KT. Definitely been on the lathe tho.
FPV is just the head, it doesn't take piston into consideration. If you know the squish, you could leave a little solder on the piston top and do it accurately with the head on barrels with pistons in the bores pushed right up the the solder. Or as you say just do it on the engine.
I've decided to try and use the old gaskets, they're slightly thicker and some 0.4mm gasket paper with them. Might be a lottery getting two gaskets to seal. But it should give me about 0.75mm on the lowest point on the RH cyl. Incidentally i measured the barrels and that side with the low squish is the slightly low on the barrel height, but only about 0.04mm max difference.
I decided on another little job which turned out taking longer.
I removed the grill off the rad, it was a little rusty, with the intention of sticking in the blast cab' and a quick blow over in satin black. Despite using the gas torch on the screw the retaining tab broke!
So I cleaned it up and made a new tab out of alloy.
I tried to use a Techno-Weld kit, which I have successfully fixed an alloy oil cooler with the in the past. Only this time I couldn't really get enough heat in to it. Rad's are tricky, they take the heat away too quick!


Now I've intimated at this stuff before, Plastex

I thought I'd give it a go. Other than filling the stripped thread on the kips linkage I've only used it on the NC30 fairing and bits of the ZXR, so . .


you pour the powder in and then drop small amounts of the liquid on top, I left it a hour, removed the bracing [used to hold in place] and then did the other side, then left over night. Then drilled the hole in the middle and blasted it to provide a good key for the paint. quick spray of paint. Putting it back together I had to give the captive nut clip thing a tap with the hammer to get it to slide on. The joint is nice and strong, bearing in mind it's only holding the grill in place but I gave it a bit of bend and no cracking. More to follow on the Plastex when I sort a few body crack out. It's good stuff!


-
James P
- Oil Injector
- Posts: 582
- Joined: Mon Mar 11, 2013 10:47 am
- Location: Sydney, Australia
Re: 'fingers KR1-S C2 tinkering with a mostly stock bike
Phil, I'll be following any longer-term reports on the robustness of that Plastex stuff with interest!
For your extra-thick base gaskets, could you make some out of the correct thickness aluminium and seal them using Kawasaki Bond (or whatever brand you use)? If you can't get the correct thickness, you could (for example) make them from 1.0mm sheet and have the cylinders machined to compensate (and in doing so, equalise their heights). In the past, I've had similar gaskets/spacers made by a firm that used a water-jet cutter. Of course, you could also use a router or (with patience) a Dremel or similar. Let us know what you decide!
Regards,
James
-
philfingers
- Heavy Smoker
- Posts: 207
- Joined: Tue Apr 12, 2011 11:14 am
- Location: Worcestershire
Re: 'fingers KR1-S C2 tinkering with a mostly stock bike
I did the plastic repairs on the NC30 2.5 years ago and it's still very strong.
The gasket paper i can get in 0.8mm or 1.0mm. I'm aiming in the middle. I may well cut some 1.0mm and try the squish measurement on this too. I want this finished now, I really need to start on the 851 motor which has been in bits for 6 months!
The gasket paper i can get in 0.8mm or 1.0mm. I'm aiming in the middle. I may well cut some 1.0mm and try the squish measurement on this too. I want this finished now, I really need to start on the 851 motor which has been in bits for 6 months!
-
KR-1R
- Premix Junkie
- Posts: 1587
- Joined: Wed May 16, 2007 2:24 am
MITAKA pistons
LOOKED AT MITAKA WEBSITE TODAY
has anyone seen this image...

for piston kit 01.4302
"THE PISTON PHOTOGRAPH IS OF THE ACTUAL MODEL DESCRIBED IN THE SPECIFICATION"
the Mitakas we have all seen have been (old GOOGLE image) look like...

GOOGLE's cached version of the image would appear to be old and the coated version is NEW??
has anyone seen this image...
for piston kit 01.4302
"THE PISTON PHOTOGRAPH IS OF THE ACTUAL MODEL DESCRIBED IN THE SPECIFICATION"
the Mitakas we have all seen have been (old GOOGLE image) look like...
GOOGLE's cached version of the image would appear to be old and the coated version is NEW??