'fingers KR1-S C2 tinkering with a mostly stock bike

Show us that box of bits in your shed!
Post Reply
KR-1R
Premix Junkie
Posts: 1587
Joined: Wed May 16, 2007 2:24 am

Re: 'fingers KR1-S C2 tinkering with a mostly stock bike

Post by KR-1R »

MITAKA? piston...

Image

Camera:Canon PowerShot G10Lens:6.1 - 30.5 mmShot at 21.5 mm (shot wide open)Exposure:Manual exposure, 1/20 sec, f/4, ISO 200, Compensation: +5/3Flash:Off, Did not fireFocus:Single, Auto AF point selection, with a depth of field of from 0.55 m to infinity.AF Area Mode: Multi-point AF or AI AF

Date:July 29, 2013   2:53:58PM (timezone not specified)(6 months, 4 hours, 32 minutes, 36 seconds ago, assuming image timezone of US Pacific)

File:600 × 569 JPEG 205,004 bytes (0.20 megabytes)     Image compression: 80%2% crop of the 4,416 × 3,312 (14.6 megapixel) original

SO THIS IS NEW STOCK? from old KR250B molds
philfingers
Heavy Smoker
Posts: 207
Joined: Tue Apr 12, 2011 11:14 am
Location: Worcestershire

Re: 'fingers KR1-S C2 tinkering with a mostly stock bike

Post by philfingers »

I'd not seen that picture. Mine were only bought about 3 weeks ago from PJ Engineering and are not coated, stamped with IKT250 underneath.
Luders
Avgas Sniffer
Posts: 3926
Joined: Fri Jun 18, 2010 11:29 am
Location: Oxfordshire

Re: 'fingers KR1-S C2 tinkering with a mostly stock bike

Post by Luders »

You could have been supplied old stock. If they have changed them, it may take a while until we start to see them.
maccas
Oil Injector
Posts: 872
Joined: Mon Sep 07, 2009 8:33 pm
Location: east yorkshire

Re: 'fingers KR1-S C2 tinkering with a mostly stock bike

Post by maccas »

I Wonder if they have updated the ring peg design or whether it is the old design where the pegs can come out more easily.

Dan
philfingers
Heavy Smoker
Posts: 207
Joined: Tue Apr 12, 2011 11:14 am
Location: Worcestershire

Re: 'fingers KR1-S C2 tinkering with a mostly stock bike

Post by philfingers »

Work has progressed, despite the lack of updates

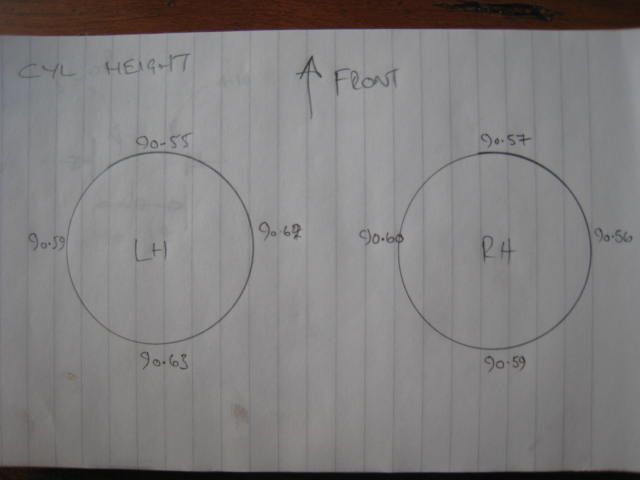
Firstly after the swapping the barrels over I checked the barrel heights, there were a few differences, you can the outside of the RH pot is lower in height
Image

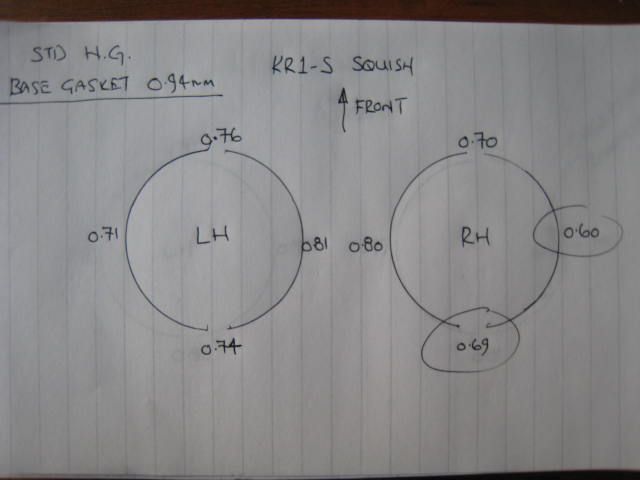
I reassembled the top end with some base gaskets I made from some 1.0mm gasket paper, it actually measured around 0.94mm. The squish check showed it was still on the tight side, the worst case 0.60mm on the outside of the RH pot
Image

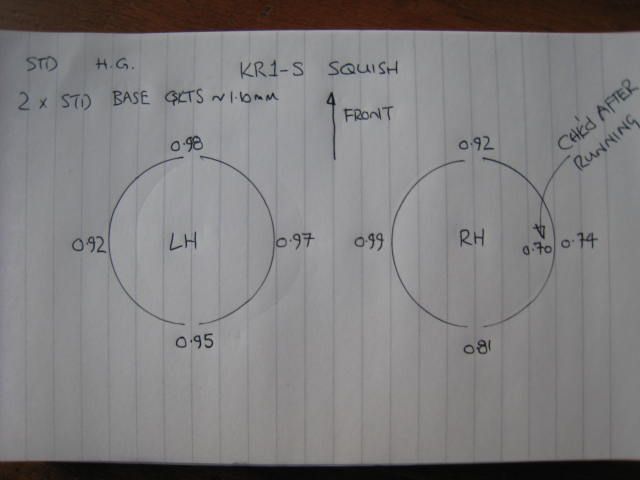
So i tried again, using two std base gaskets, these measure ~1.10mm, the results were better, the worst case, still the outside of the RH pot being 0.74mm, the largest dimension being 0.99mm. An interesting read of http://kr-1r.com/kr1s/scans/PB_031992-2.jpg shows that Stan Stephens motors were set at a 0.035" squish, which is 0.89mm. So I'm happy I've not gone too far with the gap. Here's the results. Once it was all together and completed one heat cycle I dropped some solder in the RH pot at the outside, and it was 0.70mm. Motor was cold.
Image

The broken oil pump union was causing me some grief. I bought an M6 to 4mm pneumatic fitting, made this little adapter, which would screw into the hose, but it sat too far out of the pump, cover wouldn't fit. back to the drawing board
Image
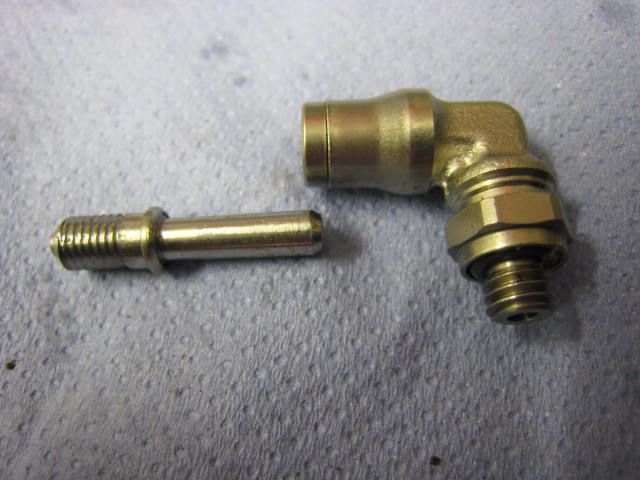
I actually ended up using the old banjo, drilling and tapping it out to M5 and making a similar little adapter similar to the one above, that was screwed and loctited into banjo, it then screwed into the hose end, a little like a self tapper. It works, that's all I can say and doesn't leak. I bought some other pneumatic fittings and 4mm pipe to do the same, but also replacing the lines. The issue is all these fittings are larger than the std banjo, which is as we know, not available as a separate item. I might give this a go at some other time

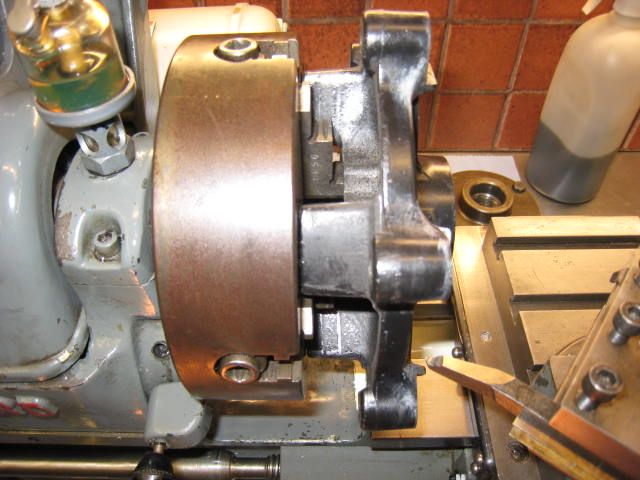
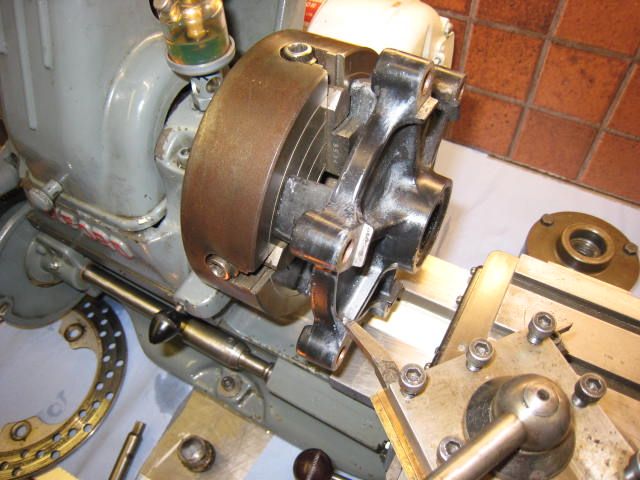
Headcoats needs his sprocket carrier machined back. Not sure if you've had it done yet HC, but I'm home again now for a few days. here's mine while the wheel was out, trying it for size on the lathe
Image
Image

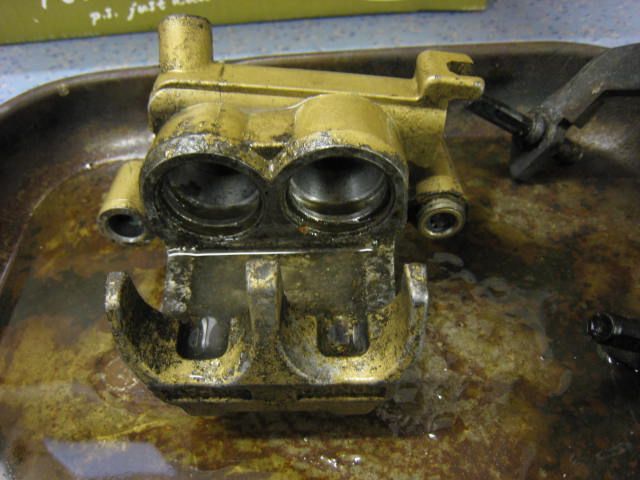
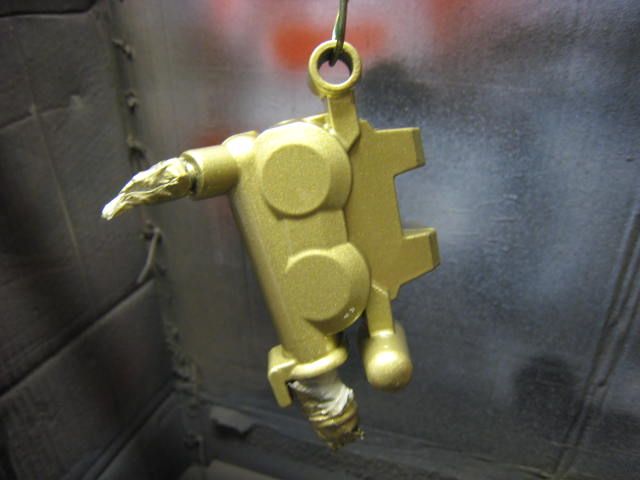
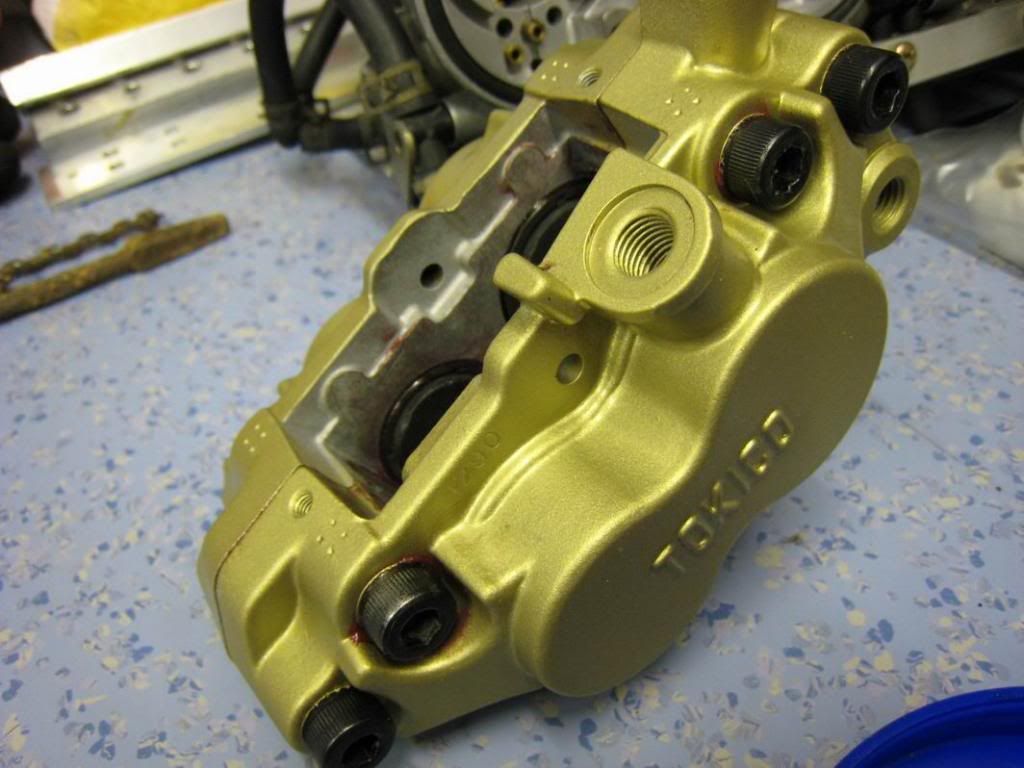
While the wheel was out I had a look at the rear caliper, it was slightly seized, mainly the slider. So a quick refurbish was in order. Pistons looked ok
Image
Image

I cleaned it up in the parts washer, then it went in the blast cab, using glass beads. Then into the ultrasonic tank to be sure it was clean, masked and paint.
I used an etch primer, then gold smoothrite [hammerite], then 2k lacquer over the top. There's obviously a difference in composition in the Hammerite. I was trying to refresh the top yoke of the NC30 and have been trying for ages. The black I used on that all reacted with the 2k lacquer, the gold didn't. Here's the finished caliper
Image
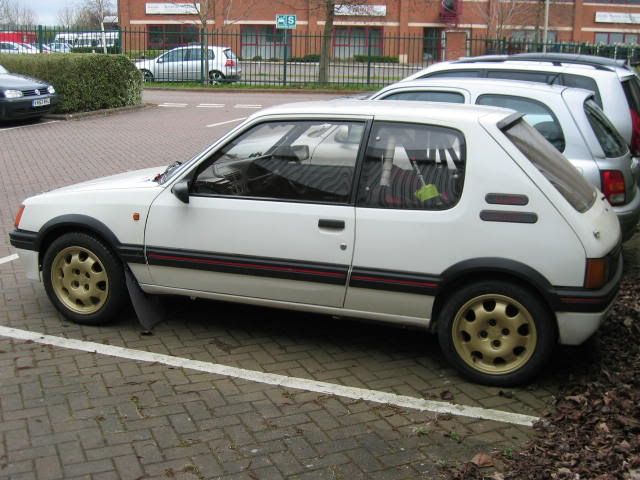
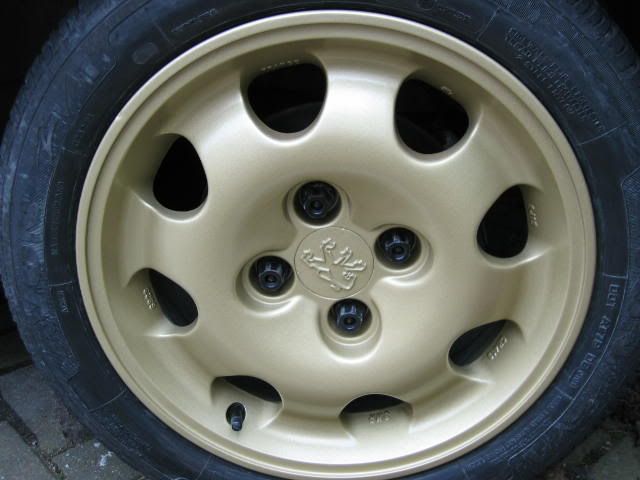
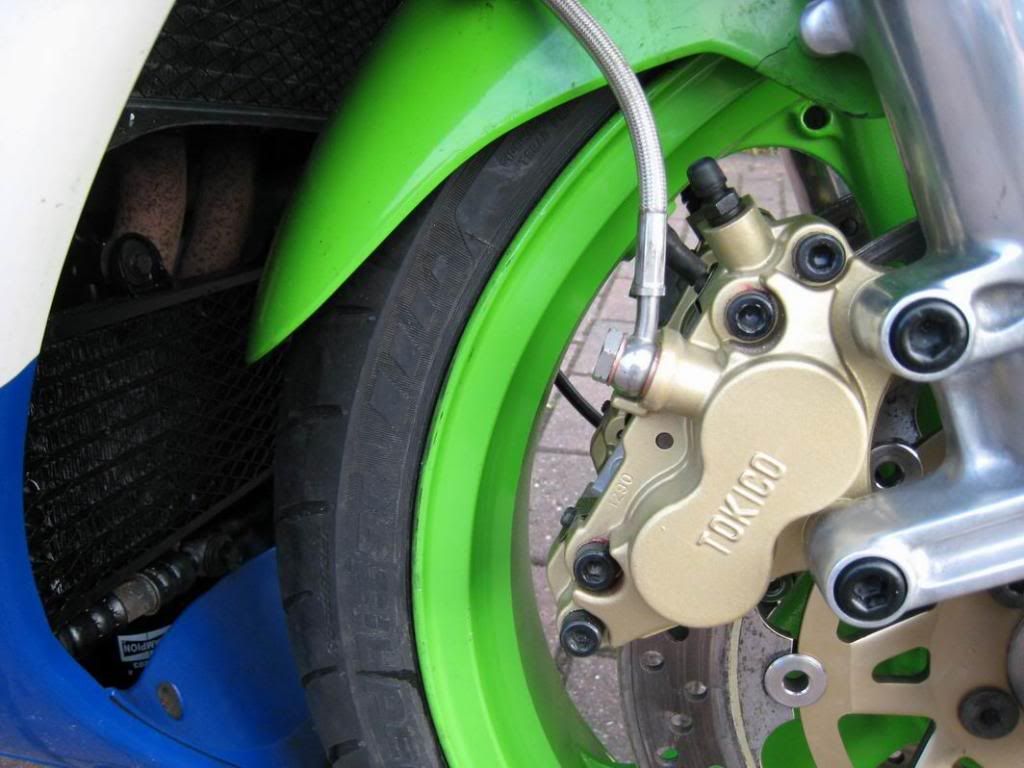
I've did the wheels on my 205 ages back with the gold, no 2k lacquer tho'. It's still good. I've also done the calipers on the ZXR H1. Good thing is it's about £7 a tin :-)
Image
Image
Image
Image

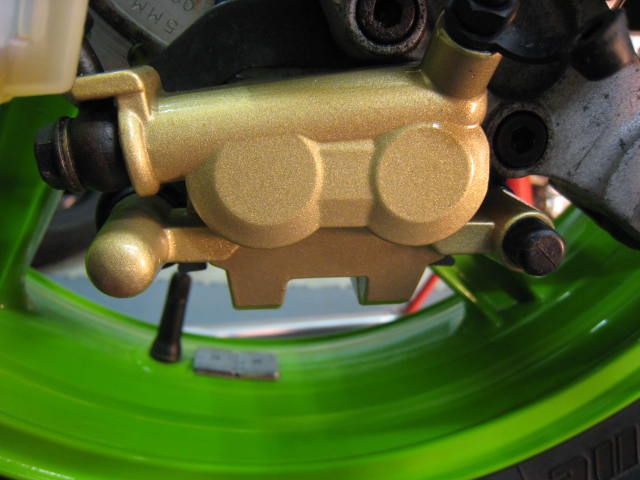
here's the finished item, bled up nice and easy. I think the fronts will need doing soon
Image
Image
philfingers
Heavy Smoker
Posts: 207
Joined: Tue Apr 12, 2011 11:14 am
Location: Worcestershire

Re: 'fingers KR1-S C2 tinkering with a mostly stock bike

Post by philfingers »

I'd ordered some of these to do the gear linkage bush in the side stand bracket, but ended up making one from oilite.
Anyone wants one, I can do them for £2 incl 2nd class post
Image

New tyres were in order. There was an old [very old!] Michelin M59 on the back in a 140/60 and a year 2000 stamped Maxxis in a 120/60 on the front. I spent ages deliberating over tyre sizes. I've always been one for sticking to stock sizes. However I eventually went with 120/60 on the front, as that size felt ok on the front. A 150/60 on the back seemed a popular choice with some forum members. I went for BT090 Pro's at £167 for the pair delivered, fitting them myself
Last year there was a group deal on Visordown for the Abba bead breaker and balancer. So far I think I've fitted 7 tyres, so I'm well on the way to getting my £160 back. Once you've done a few it gets easier. Getting the old Pirelli's off the Multistrada took some doing the first time I used it
Front tyre didn't need balancing, the back one needed 20g adding.
Image
Image

While I was at it I decided on new chain and sprockets. There was a none O ring chain which was on the service limit, with a worn Renthal sprocket on the back [43t] and similar on the front [14t]
Image

I went for this kit for £54 inc del. http://www.ebay.co.uk/itm/310801305353? ... 1439.l2649 It's non O ring, which was a first for me, I can't say I've ever fitted a non O ring chain. This bike will only go out in the fine weather, so should be ok. They also let me go with a 14t on the front instead of the stock 15t for the same price. Another trip to Cradley for a locking tab for the front sprocket, £3.70
http://www.ebay.co.uk/itm/310801305353? ... 1439.l2649

You can see in the above picture my home made laser chain alignment tool. Practical Sportsbike Mag' did an article on making these a while back. I'd been giving it a thought for a while. Picked up a cheap one on ebay. While I had the paint kit out doing the calipers I painted it too. Takes a bit of fiddling to get it set up straight and aligned.
Image
Image

you can see here, for a quick view, this is what you see. A rule, held vertically is the best was to measure the alignment, you get the idea
Image
User avatar
500bernie
Avgas Sniffer
Posts: 3396
Joined: Mon Aug 02, 2010 10:22 am
Location: Teesside

Re: 'fingers KR1-S C2 tinkering with a mostly stock bike

Post by 500bernie »

That top end is taking some time Phil, do you think they came as a pair from Kawasaki on the bike, or have they been changed/swopped?

Looking good 8)
Firecracker Red and Grey C3 300
philfingers
Heavy Smoker
Posts: 207
Joined: Tue Apr 12, 2011 11:14 am
Location: Worcestershire

Re: 'fingers KR1-S C2 tinkering with a mostly stock bike

Post by philfingers »

The casting numbers are correct for a KR1S. They could well be the original ones. bike is showing 17k I think. I know the head has been skimmed. Head is engraved with 'warner' [or 'warmer'- less likely!]. I wonder if it's been tuned. Barrels were as cast, I did relieve the ports in the base to match the gaskets
philfingers
Heavy Smoker
Posts: 207
Joined: Tue Apr 12, 2011 11:14 am
Location: Worcestershire

Re: 'fingers KR1-S C2 tinkering with a mostly stock bike

Post by philfingers »

The stock luggage hooks have seen better days. Anyone got any tips for these?
Image

I had a go at repairing some of the fairing with Plastex. Here's an example. The tail piece had a number of cracks in it. Take this crack around the rear light. I held it in the right orientation with some tape and G-clamped it to a work table. I used a rough grinding bit in a drill to grind out the backside of the crack. Pour the powder on, use the pipette to drop the liquid on and use the end of the pipette to agitate the mix a bit. It's supposed to be set in 30 mins and it looks good. However I've found leaving overnight on deeper repairs is a better option
Image
Image
Image
Image
Image
Image

The rear mudguard/hugger was cracked, you can see the previous professional repair! I had a go with the plastex on this too but it didn't seem to adhere well. As it's hidden from view I ended up drilling holes and using cable ties. Worked well, if not neat. If any one has a stock part they wish to sell I'd be interested
Image
Image

There were some scratches on the outside of the indicator housing on my bike, and the lens to a lesser degree
I used 600 grit disc on a mini DA, then 1200, then 2000. Then G3 on a polishing mop. Trouble is while the lens has come up nice and the scratches all gone, the black plastic is now grey.
At the time I was bleeding the brakes and had a rag with a little split brake fluid on it. Once I'd wiped over them with that they came up much better
I've yet to try a heat gun on it, I know that was an old trick to rejuvenate the greying trim on the 205 GTi's back to black.
Image

more to follow. . . . .
Ian964
Smoker
Posts: 88
Joined: Tue Jun 05, 2012 5:01 pm
Location: South east England

Re: 'fingers KR1-S C2 tinkering with a mostly stock bike

Post by Ian964 »

Re your luggage clips mine were similar and I had them blasted then plated in Zinc and black. Now look like new.
garye345
Premix Junkie
Posts: 1231
Joined: Tue Nov 13, 2007 8:52 pm
Location: Yorkshire
Contact:

Re: 'fingers KR1-S C2 tinkering with a mostly stock bike

Post by garye345 »

All good stuff Phil,i for one am impressed with how its coming along =D> .
Keep up the good work-and the excellent posts :!:
Nice 205 by the way 8) .
I used to be so care less,as if i could'nt careless.
philfingers
Heavy Smoker
Posts: 207
Joined: Tue Apr 12, 2011 11:14 am
Location: Worcestershire

Re: 'fingers KR1-S C2 tinkering with a mostly stock bike

Post by philfingers »

Ian964- was it plated black or painted? I think they are olive plated when new
Garye345- thanks. 205, was done a long time ago, http://forum.205gtidrivers.com/index.ph ... pic=100177
it's a log booked tarmac car, which I converted to 16v for road rallying. I still have it, it's been outside for 2 years now and needs a bit of work as it's beginning to suffer
pics here http://s188.photobucket.com/user/oilphi ... t=3&page=1
Ian964
Smoker
Posts: 88
Joined: Tue Jun 05, 2012 5:01 pm
Location: South east England

Re: 'fingers KR1-S C2 tinkering with a mostly stock bike

Post by Ian964 »

Not sure if they were olive as mine looked similar to yours. They look good in zinc and black, I was pleased with the result.
philfingers
Heavy Smoker
Posts: 207
Joined: Tue Apr 12, 2011 11:14 am
Location: Worcestershire

Re: 'fingers KR1-S C2 tinkering with a mostly stock bike

Post by philfingers »

Ian964 wrote:Not sure if they were olive as mine looked similar to yours. They look good in zinc and black, I was pleased with the result.
I'm 99% they were olive passivate originally. Were yours black passivate or black paint?
philfingers
Heavy Smoker
Posts: 207
Joined: Tue Apr 12, 2011 11:14 am
Location: Worcestershire

Re: 'fingers KR1-S C2 tinkering with a mostly stock bike

Post by philfingers »

Bit more Plastex. When i got the bike it had been painted, nicely. However underneath the panels haven't really been fixed properly and as a result some have cracked, like this RH fairing mount, which is a real shame. I've ground this out and filled with plastex both side. We all know this is a tricky little bastard to repair as it's thin and under quite a bit of stress in use.
I have a crack in the side panel of the ZXR which I need to fix. I'm guessing the pearly white is the same colour as it's the same age as the KR.
I have the paint, it's code for the pearl white I'm told is 62000 Base and 61.183 Pearl. You need a clear lacquer over the top. I could do with a proper grommet for this side too. I have one to make do for now. It was filled with silicon before!
Image

Can someone tell me is this the correct m/c and clutch bracket fr a 1-S? I know [or believe] the brake lever is wrong, it should be a black span adjustable one. Clutch lever should be black too. Question- are the aftermarket ones any good, or do I need to shell out £40 on a genuine one?
Image
Image

This LH bracket is plain nasdy, why anyone would have had that powder coated/painted without cleaning up the welds is a mystery. I have another, which i've blasted and primed, it's pretty pitted so will need filling before painting.
Image

I guess when the above bracket snapped, in an 'off' most likely, it dented the swingarm. Again why go to the bother of painting it without repairing it?
I think I'll fill the dent and stick the chain adjustment sticker over it.
Image
Post Reply