Page 2 of 3
Posted: Wed Sep 07, 2011 9:26 am
by smithyrc30
Mine have been on for about ten months now, not problems so far.

It is being used by a mate of mine because I have been overseas for 7 of those months, but I asked him to have a look and he says they look ok, no splits or cracks.
Still hats off to KR1R for having a go in the first place. If it wasn't for his efforts I would probably never experience the noise a s et of 35's make. Been worth the cash just for the noise.

Mine has been running on 95 octane from whatever servo it stops at in Aus. Not even sure if they put ethanol in it.....

It also has the rubber drilled out for the injectors as I can't be arsed with premix on the road.
Cheers KR1R, it is most appreciated. I don't really care if they fail tomorrow, I still have the 28's and the adaptors to put back on and I reckon I have had my moneys worth. =D>
Posted: Wed Sep 07, 2011 7:55 pm
by scooble
I hadn't got as far as fitting the enclosed airbox as it was a pain to get in (engine out job) so am still running the std airbox.
I managed 3 laps at Brands in July with the 35's, but had it jetted all wrong. Other than that, its just run in the garage so I don't think vibration was an issue. The manifold was split when i removed the tank, but came apart when I removed the airbox, I suspect that the jubilee clip didn't help though.
As for fuel, I've been using Tesco pump 99 octane and castol oil.
I suspect that the there may have been a curring problem with the rubber and its probably a one off. It would be convenient if I could throw a new set on, but failing that, I'll get some Mikuni flange pllate manifolds adapted ready for next year.
I realise that the manifolds was kind of prototypes, so I'm not demanding any kind of refund or anything, just glad I caught it before going out on the track, as two broken bikes in the back of the van would be no fun at all, just glad I kept it shiny side up today
Posted: Wed Sep 07, 2011 8:27 pm
by mj43
I am just building an enclosed airbox that can be taken in and out with the engine in situ. Or at least that is the plan. Must say it has been a nightmare trying to make it fit around the 35mm carbs. You can barely get a fag paper in between carbs and frame let alone an airbox. Also makes running the loom difficult. Airbox comes with mountings for a ZXR fuel pump which is essential if running a KR tank.
My version has no battery box as that is being moved forward as part of a mass centralization programme, but I could do one with less volume that keeps the battery. Will post piccies when done.
Posted: Tue Sep 13, 2011 8:48 pm
by mj43
Making the mould for the bottom half of the airbox. Gel coat applied waiting for the glass and reinforcement. That will then become the plug for the airbox.
Battery compartment has gone and in its place will be a LiPo battery smaller and lighter with the same 4Ah capacity.
Still got to design and make the lid which will house the air filter and the air feed/scoop

OK popped the mould out so now have a plug - just needs cleaning and prepping then I will be in a position to make the lowers. Plug fits in the frame nicely and can be got in and out with the engine in situ. Will have to see if carbs fit and whether it goes over the stubs. For the moment I have reed blocks with a set of old 28mm stubs in place but the stub cut off. I have come with a cunning plan to seal the air box to the engine
The raw plug before cleaning and finishing off

Posted: Sun Oct 23, 2011 5:13 pm
by mj43
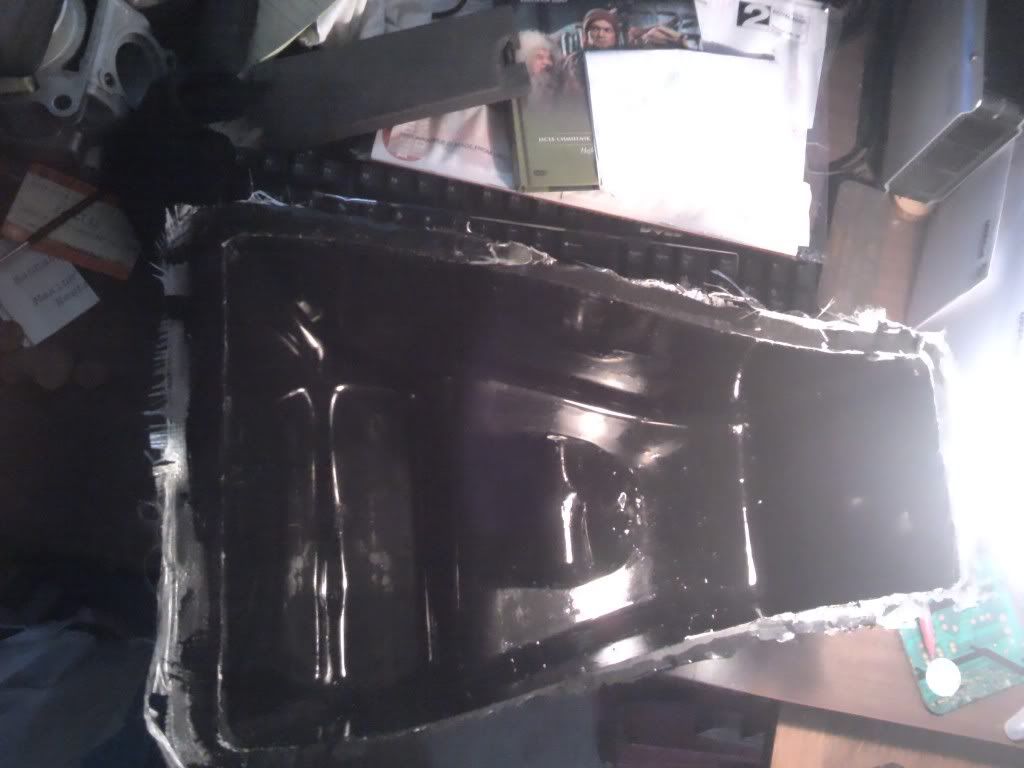
Tried making a mould of the 28mm carb rubber. First attempt ok but can be improved. Just waiting for some alloy sheet to provide a smooth floor for the moulding box.
In the mean time finally got round to making the first mould from the plug I have been working on. Started panicking when I couldn't separate it but my polypropylene strips hammered in to the edges did the trick. Came out better than expected for my first attempt at anything serious with fibreglass.
Capacity of the lower half of the airbox is 18 pints (carefully measured using UK beer glasses). This equates to about 10 litres. The lid up to the filter - which I have yet to make should be about another 5 litres so should have about 60 times engine capacity of still air. The volume behind the carb bellmouths will be about half the airbox volume so 7 to 8 litres.
Lower half airbox (in glassfibre) weighs in at 300g. Carbon fibre one will be slightly lighter.
Now to design and make a lid

Posted: Sun Oct 23, 2011 7:03 pm
by Luders
Nice one Mark. I've got my final op tomorrow, but I'll come see you as soon as I am mobile again.
Posted: Mon Oct 24, 2011 6:32 pm
by mgtkr1
mark, will you be selling a few of these airbox's?
Posted: Mon Oct 24, 2011 8:59 pm
by mj43
Matt
If they work, that is give some gain and don't make a mess of jetting etc, and they are easy to fit etc etc then I will make a batch.
However, I need to first be sure they do offer a positive advantage and it won't be until well in to next year that all the testing will be complete.
Still it is a first step

Posted: Thu Oct 27, 2011 7:14 pm
by mj43
Ok - airbox fits in the frame can be moved in and out with engine etc all in place
best bit is the carbs fit - fag paper to spare (it was always going to be tight) - but they fit
Air box makes carbs look small - reckon a set of 28mm will just disappear...

Posted: Thu Oct 27, 2011 7:26 pm
by mj43
Luders wrote:Nice one Mark. I've got my final op tomorrow, but I'll come see you as soon as I am mobile again.
Ben - Hope op goes ok. Give me a call when you are coming over.
Posted: Fri Oct 28, 2011 12:13 am
by JanBros
Mark, I want to order one

Posted: Fri Oct 28, 2011 12:55 am
by mgtkr1
mark, as usual you have a idea/project, you do it whole heartedly, no short cuts in the sparrow camp!! looks like a nice job, a cf will be nice. ive not had anytime atm but my enthusiasm with bikes is coming back. ive not long got a new job that pays fairly well so will be geting some track time and a f250 ride or two, just to make up numbers like!!
Posted: Sun Jan 01, 2012 2:00 pm
by mj43
I have totted up the material cost so far, of making the airbox.
Air Filter (K&N Triumph Tiger) £27
2 x Quick release connectors £20
Fuel Line £5
10 x Fuel Line clips £5
Y piece £3.50
Alloy separator plate £10
Gel, Resin, Glass £40
Fuel Pump £75
Pump Mount £10
Pump Relay £15
Fuel tap and seals £35
Connectors £10
2 x battery £20
Assorted foam and rubber seals £10
Dzus fastners £10
Radiator Bracket £10
The best part of £300
Add to that the material cost of making the moulds, about £100 and labour which I have lost count of the hours spent making the moulds, just takes ages. Once you have a mould making an airbox is fairly straight forward.
I am just making mould for the air scoop (snorkel). I reckon another 3 weeks I should be able to post pictures of the complete item.
Airbox is fully sealed (pressurised) in 4 main pieces, Snorkel, Upper half, lower half and a filter/separator plate. Filter plate can be adapted to take what ever filter fits, I went for the Triumph Tiger as a reasonable size and cheap.
Air pick up is from above the radiator and feeds straight to the upper part of the airbox. The radiator has to be lowered about 15mm to allow the snorkel to get a clean run.
Airbox upper half is separated from the lower by an aluminium plate which holds the air filter. Volume of the lower part of the air box is 10 litres. Upper part ~4 litres (haven't measured it yet).
Airbox can be fitted and removed with the engine in situ. Dzus fasteners allow lid to be quickly removed. Separator/filter plate lifts out giving access to the carbs. Carb cables are not captive so to get them out simply undo the clip holding the carb and it then lifts out along with all cabling and fuel lines - makes jet changes very easy especially with the 35mm carbs.
Airbox is designed for a race bike with no oil or water tanks - I am not sure if it will fit a stock machine with the tanks in place. Also as the battery compartment has been lost you need to run a different battery - I have a LiPo 4Ah unit which fits where the old battery was. Same power and only 350g. As I run total loss I have a spare battery.
Posted: Sun Jan 01, 2012 6:13 pm
by Top-shaggy
Brilliant piece of Kit, hope it works well
=D>
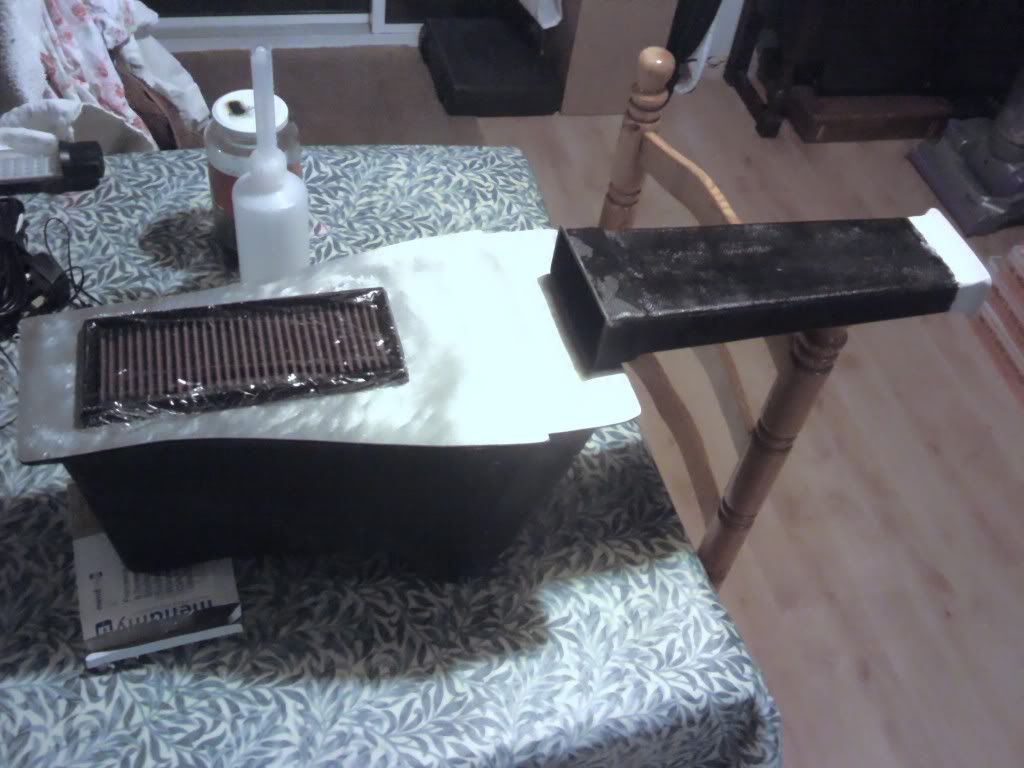
Posted: Sun Jan 22, 2012 10:38 pm
by mj43
Slowly getting there
Lower airbox with filter plate and air intake. Just need to finish the plug for the lid another week or so. Air intake picks up from above the radiator. Decided that I would move the radiator mounts not to compromise the air intake. It is as straight a shot as possible into the airbox so I can convert as much dynamic pressure into static as possible with minimal loss.
Filter plate is 2mm alloy plate. It is due to be replaced with a carbon fibre plate as it is too heavy, but for the moment alloy will do.
Not the best of pictures but it gives an idea of the shape etc. Air intake is smooth inside, I had to make the bellmouth out of filler - it was easier than making a two piece mould. For the next one I will use this one as a pattern for the mould.
To give an indication of size the airbox is 400mm long (internal dimension) the air intake is 350mm long. Air intake is 92 x 30mm inlet and 105 x 42mm at the outlet. The intake at 120mph it should flow 147 litres/second of air. The engine at 12000 rpm sucks 50 litres.