Page 1 of 1
CDI repair?
Posted: Tue Apr 08, 2008 2:52 pm
by ScottaKR
Got a fried CDI with my most recent lot of parts.
It's blown 2 capacitors and 1 resistor that I can see so far.
The resistor is burnt to a crisp, and I cant tell what it's rateing is.
I even took the top off a good KR1 CDI to compare, but it is slightly different in it's layout to the 1S CDI so it's no good as a reference.
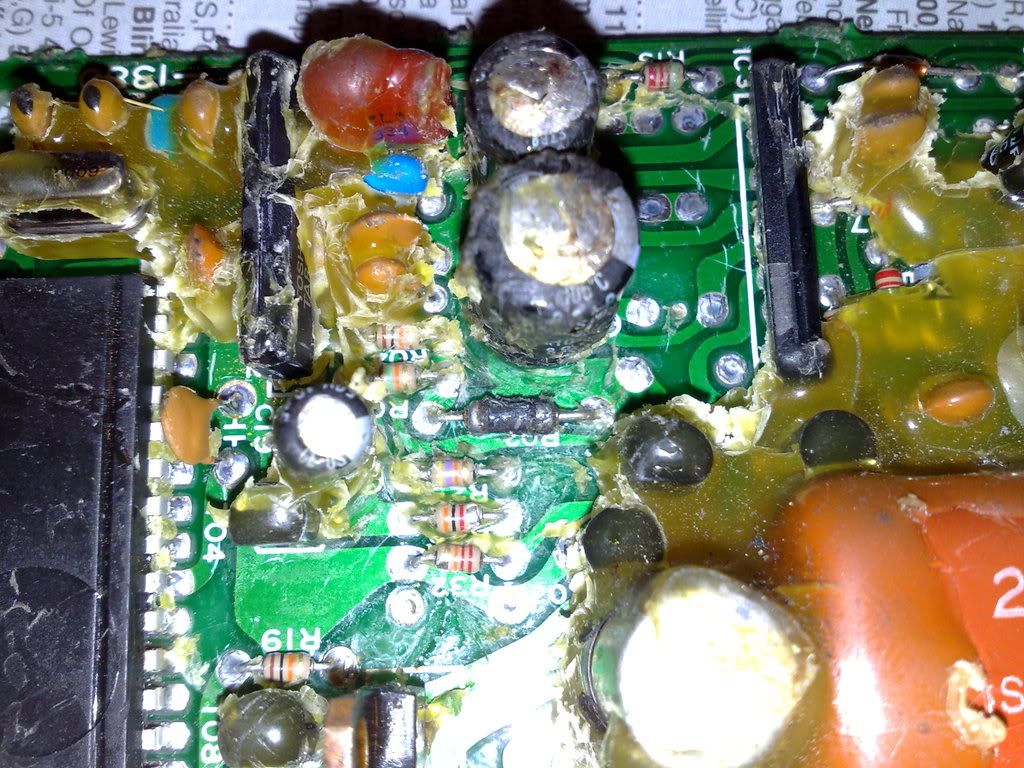
The fried resistor marked R02 on the PCB just below the 2 blown capacitors is the one I need.
If anyone has a duff KR1S CDI unit they can open up and check for me, I'd be very gratefull. Just need the color code or a good clear photo.
Cause of death from what I was told was a dud regulator that first cooked the tacho then the CDI a short time later.
Cheers, Scott.
Posted: Sat Apr 12, 2008 1:02 am
by ScottaKR
Surely someones got a dead 1S CDI they can open up [-o< even if just to confirm that these are the components that usually fry.
Posted: Sat Apr 12, 2008 8:27 am
by corvine
Hi ScottaKR, THe value of the resistor is 20 Ohms and looks like something between .25 - .5W. Hope that helps.
Posted: Sat Apr 12, 2008 11:02 am
by mgtkr1
scott, ill have a look.
i only have a duff kr1 cdi and comparing to the pic it has a few diffrences, mainly the numbers.
Posted: Sat Apr 12, 2008 2:13 pm
by ScottaKR
Corvine: Thanks for that. Was that a KR1S CDI or a KR1? I know the resistor in the same position in the KR1 is 20ohm, but I wanna be sure it's the same for the 1S before I replace it.
mgtkr1: I only got the one KR1S CDI and the resistor is labeled "R02", the rest of mine are KR1 where the resistor in the same position is labelled "R05"
Posted: Sat Apr 12, 2008 4:42 pm
by corvine
Hi ScottaKR, I can only now assume it is a KR1S because I have not got the top with the part number on it to hand and therefore say definetively.
BUT! having said that, it is the same as your picture and is the resistor labeled R02.
You ought to check the other parts associated with this R and not just replace it. It will have a similar job in the KR1 CDI. I hope I'm not telling you how to do things!
Posted: Sun Apr 13, 2008 2:42 am
by ScottaKR
corvine wrote:Hi ScottaKR, I can only now assume it is a KR1S because I have not got the top with the part number on it to hand and therefore say definetively.
BUT! having said that, it is the same as your picture and is the resistor labeled R02.
You ought to check the other parts associated with this R and not just replace it. It will have a similar job in the KR1 CDI. I hope I'm not telling you how to do things!
Terrific, thanks Corvine.
Looks like yours is a 1S unit then. I'm replaceing the resistor and the 2 capacitors directly above it in the picture to begin with.
If there is still a problem after that, I'll have to have a closer look, or handball it off to my brother who's an Auto Electrician and plays around with a lot of electronics as well.
Also, does anyone know a good way of removeing the yellow stuff they pour all over the PCB and components?
I had to carefully dig it off, but cant really get into the tighter spots without damageing things (maybe a mild solvent?). Still ended up leaving a few superficial scratches on the PCB coating.
Posted: Sun Apr 13, 2008 8:30 am
by corvine
Hi ScottaKR. Fortunately it's a heat deposited resin. All you'll need is a heat gun with a small nozzle to heat a small area at a time, heat both sides of the area your workinig on to get the heat into the resin not the components. Use blunt small screwdivers to move it around and collect it up. I think you'll find there's no need for a solvent, which could be a disaster. Oh and no digging!
Posted: Mon Aug 02, 2010 3:30 am
by glidercoach
I do believe I have found the reason my K250 wont stay running.
This is my post on this forum:
viewtopic.php?t=6246&postdays=0&postorder=asc&start=15
Can the CDI units be repaired? How do you safely open the CDI unit? The black rubber is pretty tough.